Initially I starting blogging just for an entertainment and fun, and after that facing more problem and more reviews and suggestions about my page, and I realized most of them expecting something from me. So you have to utilize your talent and make people who are visits to your site, full fill their need and make stay people in your page, those kind of ideas and thoughts comes in m mind. So for that i’m taking more important to my blog and my blog visitors. So here I’m show the tutorial about my demos page, most of them visits my demos page already I know. Here I’m going to reveal the coding of that page. That is very simple. But it is very important for the beginners of html beginners.

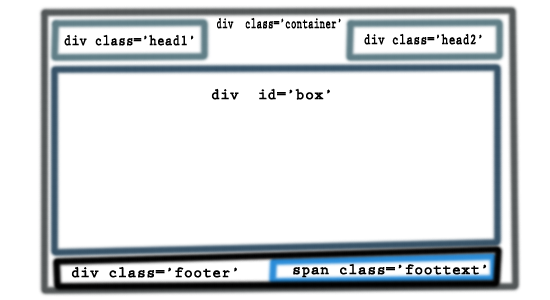
Every of page visitors know this page, demos index page. That page is watermarked in the above image. I thought users don’t want to scroll my page just want to show very tutorials in a single and non-scroll page, so I planned to use facebook style scroll bar. And planned to show and get all the details though here, means demo page and download links, here I’m use box.com storage for all my data. So for I planned to make three div column. They are.
- HEADER
- CONTAINER
- FOOTER
HEADER
Header contains only the logo of the site and details about the site. That’s what I done here.CODE
   <div class="2myheader" id="myheader">
     <div class="head-1">
       <a href="http://www.2my4edge.com">
          <img src="demos-imgs/2my4edge logo.png" alt="2my4edge-logo" title="logo" width="230" height="80" >
          <span class="demo"> DEMOS </span>
       </a>
      </div>
   <div class="head-2">
      <span class="site-name">
         <a href="http://www.2my4edge.com"> www.2my4edge.com </a>
      </span>
   </div>
   </div>
CSS
* { margin:0;
 padding:0;
}
a { text-decoration:none;
 }
h2 { font-family:"Courier New", Courier, monospace;
     font-size:18px;
     color:#336;
    }

body { background:#000;
     }

#myheader { width:970px;
            border-left:2px #999 solid;
            border-right:2px #999 solid;
            margin:0 auto;
            min-height:110px;
          }

.head-1 {  margin-top:10px;
           margin-bottom:5px;
           min-height:90px;
           border:0px green dashed;
           float:left;
       }

.head-2 {  margin-top:10px;
           margin-bottom:5px;
           margin-right:80px;
           font-family:Tahoma, Geneva, sans-serif;
           min-height:50px;
           padding-top:40px;
           font-size:24px;
           color:#64AE59;
           font-weight:bold;
           float:right;
           border:0px green dashed;
       }

.site-name > a  {
           font-family:Tahoma, Geneva, sans-serif;
           min-height:50px;
           font-size:24px;
           color:#64AE59;
           font-weight:bold;
           float:right;
           border:0px green dashed;
           text-decoration:none;
         }

.site-name > a:hover  {
           font-family:Tahoma, Geneva, sans-serif;
           min-height:50px;
           font-size:24px;
           color:#fff;
           font-weight:bold;
           float:right;
           border:0px green dashed;
           text-decoration:none;
       }


.demo { font-size:22px;
       font-family:"Comic Sans MS", cursive;
       font-weight:bold;
       color:#3F457A;
       text-decoration:none;
     }

a > .demo { font-size:22px;
             font-family:"Comic Sans MS", cursive;
             font-weight:bold;
             color:#3F457A;
             text-decoration:none;
        }
thus the above, the header section is ends. read the code clearly get understand, now let see the footer.
FOOTER
Usually all the footer content must have author details and site name and copy rights users details that what I done here too.
CODE
<div class="myfooter" > <span class="foot-text"> <span class="foot-name"> <a href="https://plus.google.com/101887107283193256209">Arunkumar Maha</a> </span> © <a href="http://www.2my4edge.com">2my4edge.com</a> </span> </div>
CSS
.myfooter {  width:970px;
             border-left:2px #999 solid;
             border-right:2px #999 solid;
             border-bottom:2px #999 solid;
             padding-bottom:10px;
             padding-top:10px;
             margin:0 auto;
             min-height:30px;
 }

.foot-text { float:right;
             font-family:Tahoma, Geneva, sans-serif;
             font-size:20px;
             color:#4A4066;
             text-decoration:none;
             margin-right:50px;
 }

.foot-text > a {
            font-family:Tahoma, Geneva, sans-serif;
           font-size:16px;
           color:#4A4066;
           text-decoration:none;
 }

.foot-name{ color:#2E6078;
           font-size:20px;
           font-family:Tahoma, Geneva, sans-serif;
  }

.foot-name > a{ color:#fff;
                 font-size:20px;
                 font-family:Tahoma, Geneva, sans-serif;
  }
That is for footer just call with the span tag with some of footer content. as the above did, that will be comes like this.

MAIN CONTAINER
Here in my main container everybody easily guess this is done with div tag, but I done it ul li listing tags, align three li tag in a line, which means align all the tag with help of width fixing. We should have to learn the details about height and width, which means min-height max-height, min width max width like that. That has more. Now see the code and css.
CODE
<div class="box" id="box">
   <ul class="ulclass">

   <a href="http://www.2my4edge.com/2013/07/file-download-coding-using-php-and-mysql.html" target="_blank">
   <li class="liclass">File download coding using PHP and MySql </li>
   </a>

               <a href="http://demos.2my4edge.com/file-download-demo/" target="_blank">
               <li class="lidemo"> DEMO </li>
               </a>

               <a href="https://www.box.com/s/v7xwf2u0uuroxq7iujik" target="_blank">
               <li class="lidown"> DOWNLOAD </li>
               </a>

   <a href="http://www.2my4edge.com/2013/07/simple-login-logout-system-using-php.html" target="_blank">
   <li class="liclass">Simple login and logout system </li>
   </a>

               <a href="http://demos.2my4edge.com/login-system/" target="_blank">
               <li class="lidemo"> DEMO </li>
               </a>

               <a href="https://www.box.com/s/5sjo9uq6uo4wthskqy4a" target="_blank">
               <li class="lidown"> DOWNLOAD </li>
               </a>

     </ul>
     </div>
CSS
.box { height:500px;
       overflow:scroll;
       width:970px;
       border-left:2px #999 solid;
       border-right:2px #999 solid;
       margin:0 auto;
 }

.liclass { color:#FFF;
           background-color:#397693;
           list-style:none;
           max-width:560px;
           min-width:560px;
           min-height:15px;
           max-height:15px;
           overflow:hidden;
           border:1px #999 solid;
           font-family:Tahoma, Geneva, sans-serif;
           padding:15px;
           margin-left:5px;
           margin-bottom:7px;
           float:left;
  }
a > .liclass:hover { color:#000;
               background-color:#CCC;
               list-style:none;
               max-width:560px;
               min-width:560px;
               min-height:15px;
               max-height:15px;
               overflow:hidden;
               border:1px #999 solid;
               font-family:Tahoma, Geneva, sans-serif;
               padding:15px;
               margin-left:5px;
               margin-bottom:7px;
               float:left;
               text-decoration:underline;
 }


.lidemo { color:#FFF;
           background-color:#5F3D87;
           list-style:none;
           text-align:center;
           max-width:120px;
           min-width:120px;
           min-height:15px;
           max-height:15px;
           border:1px #999 solid;
           font-family:Tahoma, Geneva, sans-serif, cursive;
           padding:15px;
           margin-bottom:7px;
           margin-left:5px;
           float:left;
 }
a > .lidemo:hover { list-style:none;
               text-align:center;
               max-width:120px;
               min-width:120px;
               min-height:15px;
               max-height:15px;
               border:1px #999 solid;
               font-family:Tahoma, Geneva, sans-serif, cursive;
               padding:15px;
               margin-bottom:7px;
               margin-left:5px;
               float:left;
               text-decoration:none;
  }


.lidown { color:#FFF;
           background-color:#42525E;
           list-style:none;
           text-align:center;
           max-width:130px;
           min-width:120px;
           min-height:15px;
           max-height:15px;
           border:1px #999 solid;
           font-family:Tahoma, Geneva, sans-serif;
           padding:15px;
           margin-bottom:7px;
           margin-left:5px;
           float:left;
 }

.ulclass { list-style-type:none;
           padding:15px;
  }
after the container tag code applied the design will be like.


And finally how to do that in class box has overflow scroll. That make the page scroll bar, and there I I used facebook style scroll bar, for this details coding refer here. I already posted about that facebook style scroll bar.
That’s it in my demos index page. Try this coding. Make useful get this coding in the above link.
RELATED POSTS:
Change text & background color while selecting text using CSS3
Facebook Style Textarea Auto Grow Using JQuery Plugin and Css
Change the colored image into black and white image on image hover
Floating menu using Jquery plugin
RELATED POSTS:
Change text & background color while selecting text using CSS3
Facebook Style Textarea Auto Grow Using JQuery Plugin and Css
Change the colored image into black and white image on image hover
Floating menu using Jquery plugin

You are Awesome Bro..Thanks For Everything..
ReplyDeletethanks, can you help me
ReplyDeletehttp://stackoverflow.com/questions/29127689/how-to-disable-share-button-when-user-click-share-and-enable-it-after-3-hours